5. Work with series
5.1. Fill a range of cells with the same information
- Enter a text, for example "Hello", in cell A1.
- Position the mouse pointer at the right-bottom corner of the cell, the pointer appears as a +.
- Click without releasing the mouse button and move the pointer to cell A10 then release.
- The cell range from A1 to A10 is now selected, position the mouse pointer at the right-bottom corner of cell A10
- Click without releasing the mouse button and move the pointer to cell C10 then release.
- The cells from A1 to C10 are all filled with the value "Hello".
5.2. Fill a column with incremented values
This is the case for example if we want to fill a column with an order number for the rows of our worksheet:
- Enter 1 in cell A2
- Position the mouse pointer at the right-bottom corner of cell A2, click and hold and drag to the desired line, for example 101.
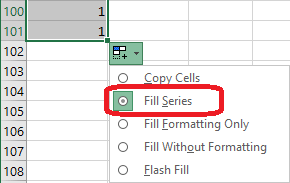
- The cells of column A are filled with the value 1
- Use the Auto Fill Options button
 and select Fill Series
 - The series in column A is now filled with the values 1, 2… 100.
We can do otherwise to have the same result:
- Enter 1 in cell A2 and the value 2 in cell A3
- Select the two cells A2 and A3
- Position the mouse pointer at the right-bottom corner of cell A3, click and hold and drag to the desired line, for example 101.
- The cells of column A are filled with the values 1, 2… 100.
We can use this technique called Autofill to have for example an incrementation of 4 from the value 11:
- Enter 11 in cell A2 and the value 15 in cell A3
- Select the two cells A2 and A3
- Position the mouse pointer at the right-bottom corner of cell A3, click and hold and drag to the desired line, for example 101.
- The cells of column A are filled with the values 11, 15, 19… 403, 407.
Other situations where the autofill is automatic:
- Enter "Customer 1" in cell B2, "Monday" in cell C2, "January" in cell D2, a date for example "01/02/2018" in cell E2 and "1st quarter" in cell F2
- Select cells B2 to F2
- Test the autofill and notice…
NB. The incremented feedback also applies to formulas; see the next section 6 on formulas.
5.3. Date list creation
The autofill feature has special options for the case of dates.
- In a worksheet, select a cell and enter a date for example 02/01/2018
- Use the autofill to fill a certain number of cells below.
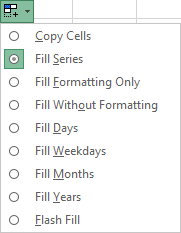
- Then use the Auto Fill Options button to customize this copy:
- to keep only the working days in your list, use the option Fill Weekdays
- to have monthly or annual intervals, use the options Fill Months and Fill Years respectively.
5.4. Using the Fill Series... command
This command allows you to customize your series:
- Enter a value in cell A1
- Select the range A1:A20
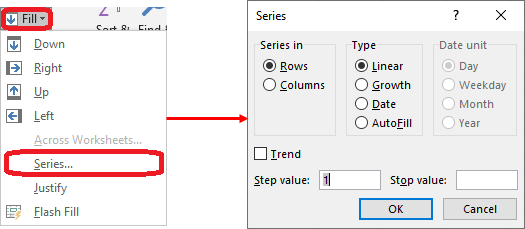
- Under the Home tab, in the Editing group, click on the Fill button, then on Series .... The Series dialog box appears.
- In this dialog box, enter the Step value and optionally the Stop value.
- If you choose the Linear type, the value will be incremented according to the value of the step
- If you choose the Growth type, the value will be multiplied each time by the value of the step
- You choose the Date type for a series of date values. In this case, choose the Date unit that suits you.
Reader comments
