8. Work with spreadsheets
By default, when you create a new workbook (= Excel file), it contains a single worksheet named "Sheet1".
You can perform the following tasks with worksheets in an Excel workbook:
- Add more worksheets
- Rename a worksheet
- Move or copy a worksheet
- Delete a worksheet
8.1. Adding a worksheet to a workbook
To add a new worksheet to a workbook, do one of the following:
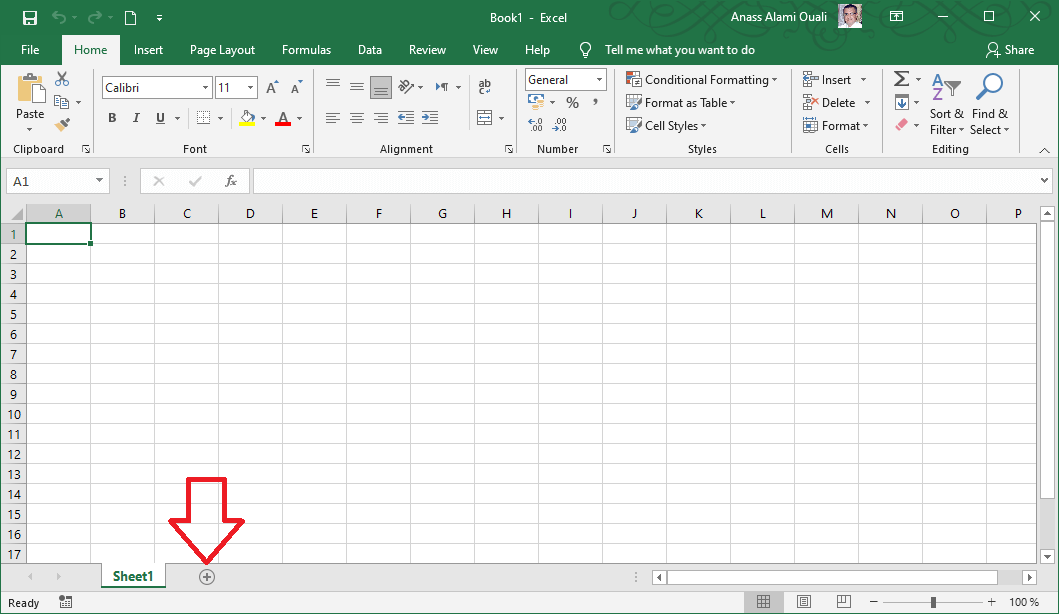
- Click the Add Sheet button
 located at the bottom left of the Excel window
Or
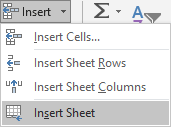
- Use the Insert button in the Cells group on the Home tab and choose Insert Sheet:
8.2. Renaming a worksheet
You should give meaningful names to your worksheets. To rename a sheet :
- Double-click on the sheet name to make it editable
- Enter the new name for the sheet and
- Validate with the Enter button on the keyboard

Other method:
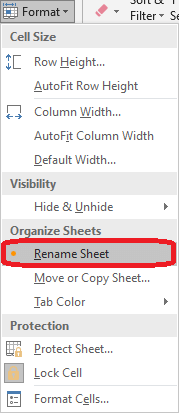
- Use the Format command on the Home tab of the Ribbon
- Click on Rename Sheet. The name of the sheet becomes editable
- Enter the new name for the sheet and validate with the Enter button on the keyboard
8.3. Moving or copying a sheet
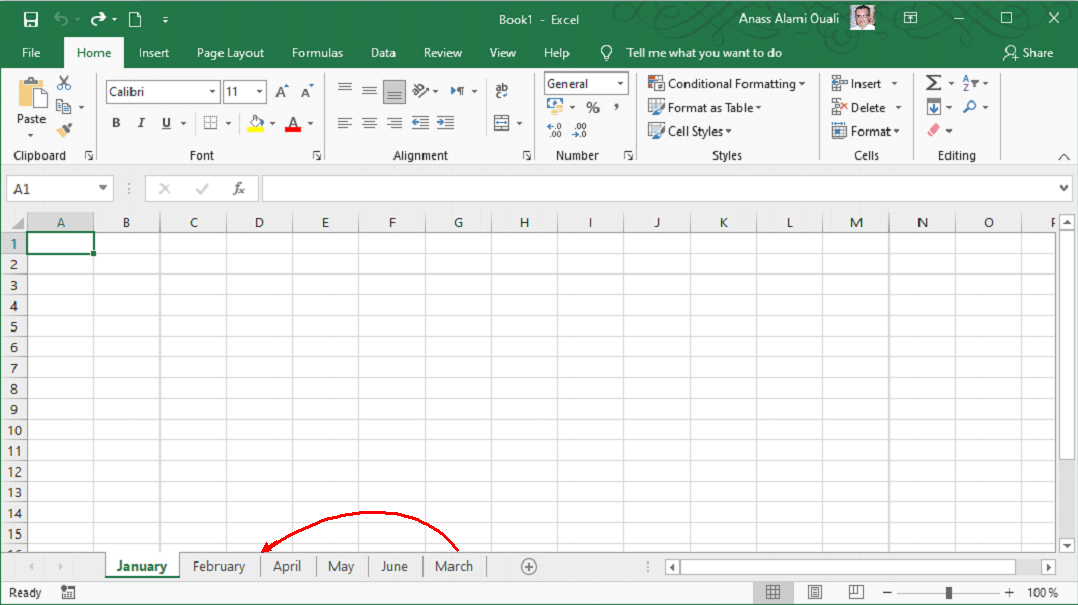
Moving a sheet in a workbook allows us to change the order of the sheets. In the following example, we want to move the sheet named March to the right place:
To move a sheet :
- Click on the name of the sheet "March" and hold down the mouse button
- Move the mouse pointer; a small arrow shows you where your sheet will be placed
- When the little arrow is in the right place as shown below, release the mouse pointer

If you want to create a copy of the sheet, proceed in the same way, but while moving the mouse pointer, hold down the Ctrl key on the keyboard.
Using the Move or Copy dialog box
You can perform the same tasks using the Move or Copy dialog box. Using the Move or Copy dialog box has one advantage over the previous method; it gives you the ability to move or copy a sheet to another workbook.
Proceed as follows to move or copy a sheet:
- Select the sheet you want to move or copy by clicking on its name at the bottom of the screen
- Open the Format command menu on the Home tab of the Ribbon, and click Move or Copy Sheet...
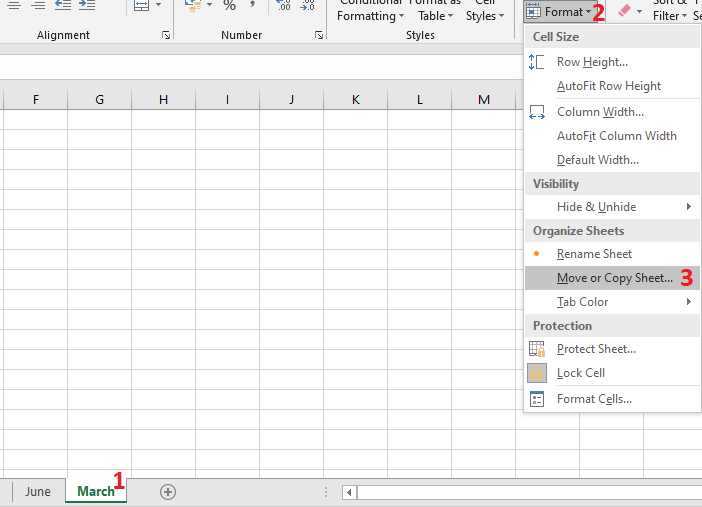
- The Move or Copy dialog box is open
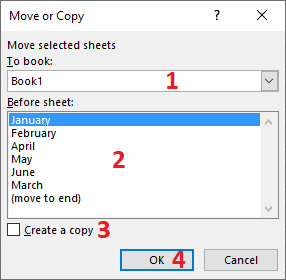
- In this dialog box :
- If you want to move or copy to another workbook, select it in the In To book list. The destination workbook must of course be open to find it in this list
- In the Before sheet list, choose the position where you want to place your sheet
- If you want to create a copy of the sheet, check the Create a copy box. Otherwise, if you only want to move the sheet without creating another copy, then leave this box unchecked.
- Confirm with the OK button.
8.4. Deleting a sheet
To delete a sheet :
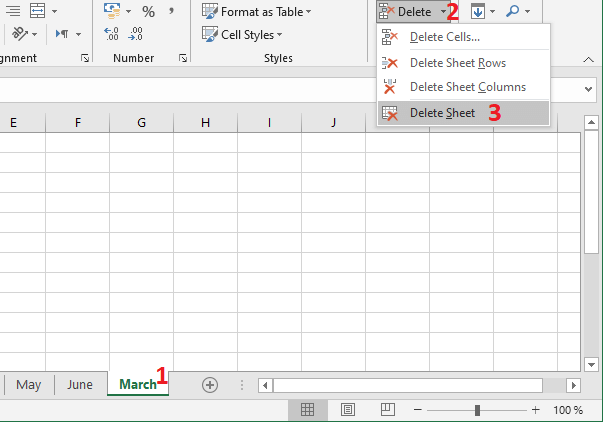
- Select the sheet you want to delete by clicking on its name at the bottom of the screen
- Open the Delete command menu on the Home tab of the Ribbon, and click Delete Sheet... The sheet is deleted.
8.5. Formulas involving cells from another sheet
In some situations we need to reference cells from other sheets in the formulas of the current sheet. Here is an example:
I record on each sheet of my workbook the number of items sold per month. The extract for the month of January is as follows:

For the month of February, I add a comparison column with the result of the previous month:

The formula in cell H4 involves cell G4 on the January sheet. To enter the formula in cell H4, proceed as follows:
- Write "=(" using the keyboard
- Click on cell G4 with the mouse
- Write "-".
- Then click on the tab of the January sheet and then on cell G4 in that sheet
- Write " )/ ".
- Then click on the tab for the February sheet and then on cell G4 on that sheet
- Use the Autofill to copy the formula to the range "H5:H8".
Then click on cell H4 and notice the formula displayed in the Formula Bar:
=(G4-January!G4)/G4
We can see from this formula that to reference a cell in another sheet, you need to write the name of the sheet followed by the character "!" and then the address of the cell.
Exercise
Exercise - Working with spreadsheets